99b77ff3c2
in settings. Selecting the "openpgpjs" GPG Library now performs all
crypto in-app via OpenPGP.js instead of the native gpg binary, so the
plugin works on mobile (Android/iOS) as well as desktop. The native
"CLI commands" path is unchanged and remains the choice for OS keychain
and YubiKey users.]

feat: implement OpenPGP.js backend for mobile support

The pgpLibrary setting and its "openpgpjs" option already existed in
1.1.5, but choosing it hid the native UI without providing an
implementation. This adds that implementation as an opt-in second
backend, leaving the native gpg path fully intact.

Changes:
- src/openpgp.ts: OpenPGP.js getListPublicKey/gpgEncrypt/gpgDecrypt,
  an in-memory passphrase cache, and browser-safe base64 helpers.
- src/PassphraseModal.ts: prompts for the private-key passphrase
  (mobile has no pinentry/gpg-agent).
- src/gpg.ts: the three crypto functions dispatch on settings.pgpLibrary;
  child_process is now required lazily so the module loads on mobile.
- src/Settings.ts: adds pgpPublicKeyArmored, pgpPrivateKeyArmored,
  pgpPassphrase, pgpPassphraseCacheMinutes; guards process.platform.
- src/SettingsTab.ts: renders armored-key/passphrase/cache UI in the
  openpgpjs branch (instead of only hiding native settings); fs is now
  required lazily; hides the native sign toggle in openpgpjs mode.
- src/EncryptModal.ts / src/DecryptPreviewModal.ts: openpgpjs branches
  (single configured key, passphrase prompt + cache, browser-safe base64).
- manifest.json: isDesktopOnly false. styles.css: .gpg-key-textarea.
- README.md: documents the openpgpjs library option.

The base64 wire format is identical between backends, so blocks encrypted
with native gpg and with OpenPGP.js are interchangeable for the same key.

Co-Authored-By: Claude Opus 4.7 (1M context) <noreply@anthropic.com>
4.9 KiB
GPG Encrypt
This project is developed by https://www.lajg.dev, it is an Obsidian plugin that aims to perform encryption using the native tool of the GPG operating system, you can use online encryption or full document encryption.
Funding URL
If you find this plugin helpful, please consider support it in https://www.lajg.dev/donate/
Configuration
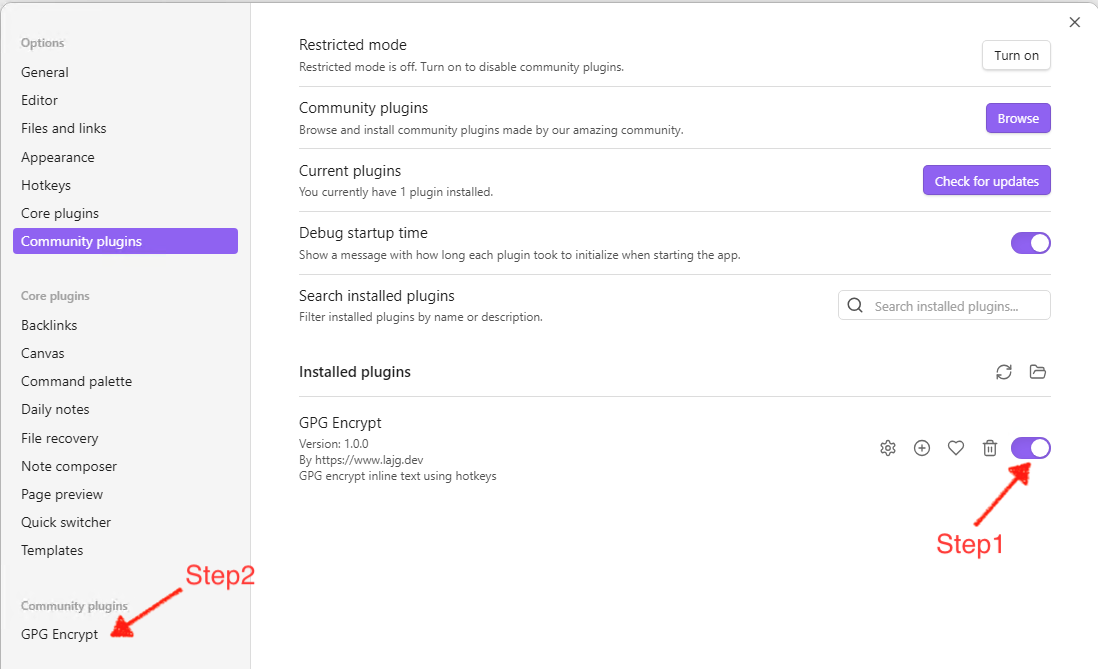
The first thing to do is activate the plugin as shown in the image (Step 1), then go to the settings (Step 2):
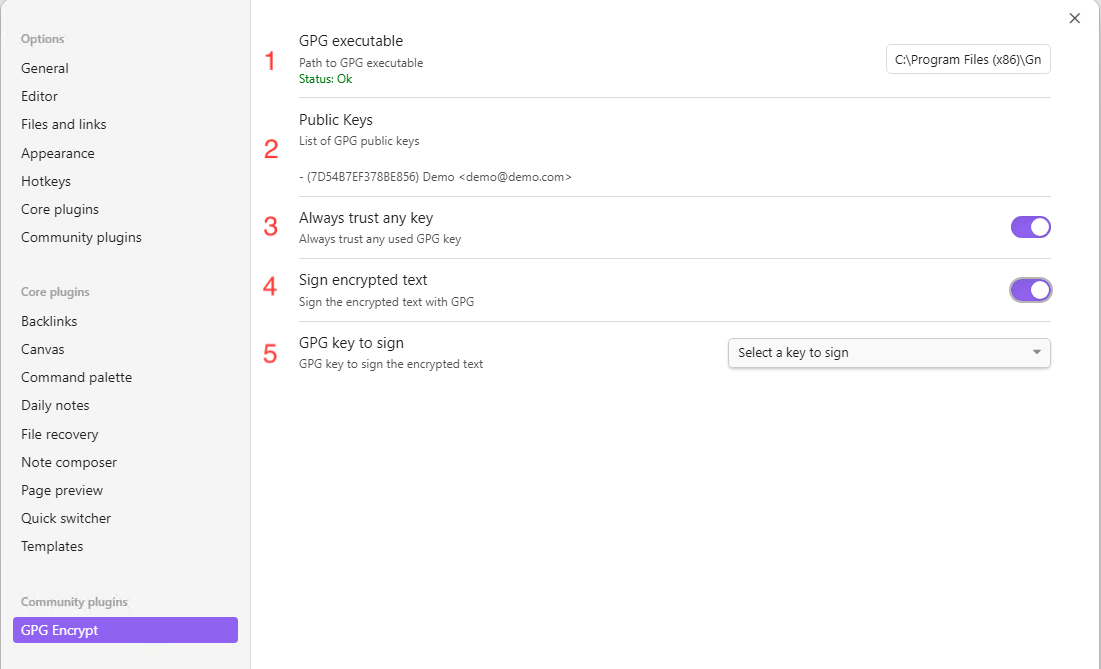
Now in the settings you will find the following elements to configure:
- Path where the executable is located (gpg, gpg2, gpg.exe or gpg2.exe), you must enter the full path, and depending on your OS it may be Windows (Example
C:\Program Files (x86)\GnuPG\bin\gpg.exe) or it can be MacOS (Example/usr/local/bin/gpg). This will do a real-time validation that the executable exists and that it runs a version of GPG - Once a GPG executable has been chosen, a list of the GPG keys that were found in your Operating System will be listed (for information purposes).
- Flag used to always trust the GPG keys that are stored in the Operating System regardless of their trust level per key.
- Flag to mark if you want to sign the text when encrypting it
- If you mark point 4 as true, point 5 will be activated with a drop-down list of the keys in your Operating System, you must select one with which it has its respective private key, this will mean that every time you go to encrypt a text, this will also be signed with that private key.
OpenPGP.js library (desktop and mobile)
The GPG Library setting lets you choose how encryption is performed:
- CLI commands — the default behaviour described above: encryption is delegated to the native GPG executable installed on your system. Works with the OS keychain and security keys such as YubiKey. Desktop only.
- openpgpjs — encryption is performed in-app by OpenPGP.js, with no native GPG executable required. This works on desktop and mobile (Android/iOS).
When openpgpjs is selected, the settings show:
- Public Key (Armored) — paste your ASCII-armored public key (used for encryption).
- Private Key (Armored) — paste your ASCII-armored private key (used for decryption, stored in the plugin's local data).
- Private Key Passphrase (optional) — leave blank to be prompted for the passphrase at decrypt time (recommended); or save it to be decrypted automatically.
- Passphrase cache duration (minutes) — how long an entered passphrase is kept in memory before being required again.
- Sign when encrypting — also sign the text with your private key.
Note: in
openpgpjsmode the private key is stored in the plugin's local data (data.json). Only enable the saved passphrase if you understand that it is written to disk in plain text.
Encrypt some text
Step 1 - In a note you have, select the text you want to encrypt (For inline encryption) and open the command palette Step 2 - In the command palette, look for the "GPG Encrypt" option, here you will have the option to encrypt inline (The block of text that you selected in step 1) or to encrypt the entire document. Step 3A - A pop-up window will appear with the list of GPG keys available in your Operating System, select one or more recipient keys that you can decrypt this text later (It is mandatory to select at least one)
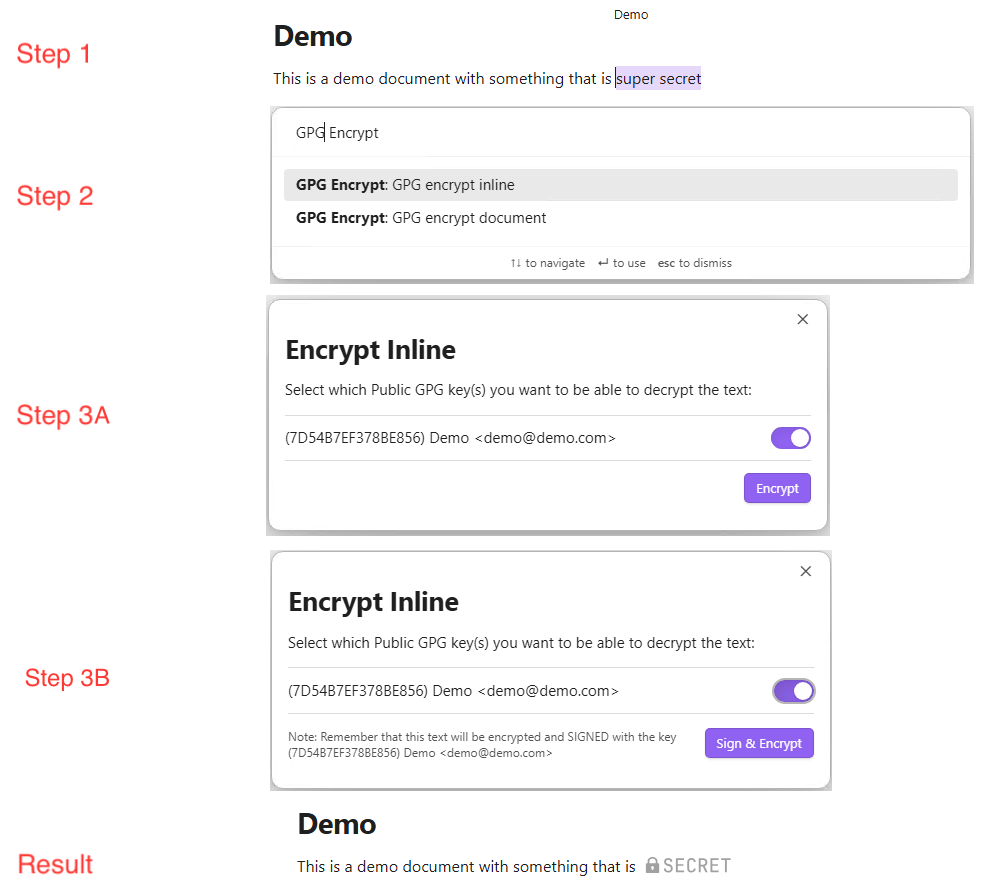
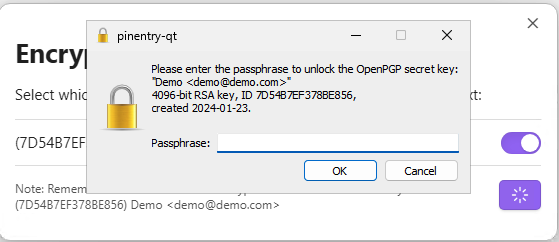
Step 3B - If you select sign and encrypt, the only difference with Step 3A is that now the button will tell you that it is going to Sign and Encrypt, and this may prompt you for your phasphrase to sign the text.
Decrypt some text
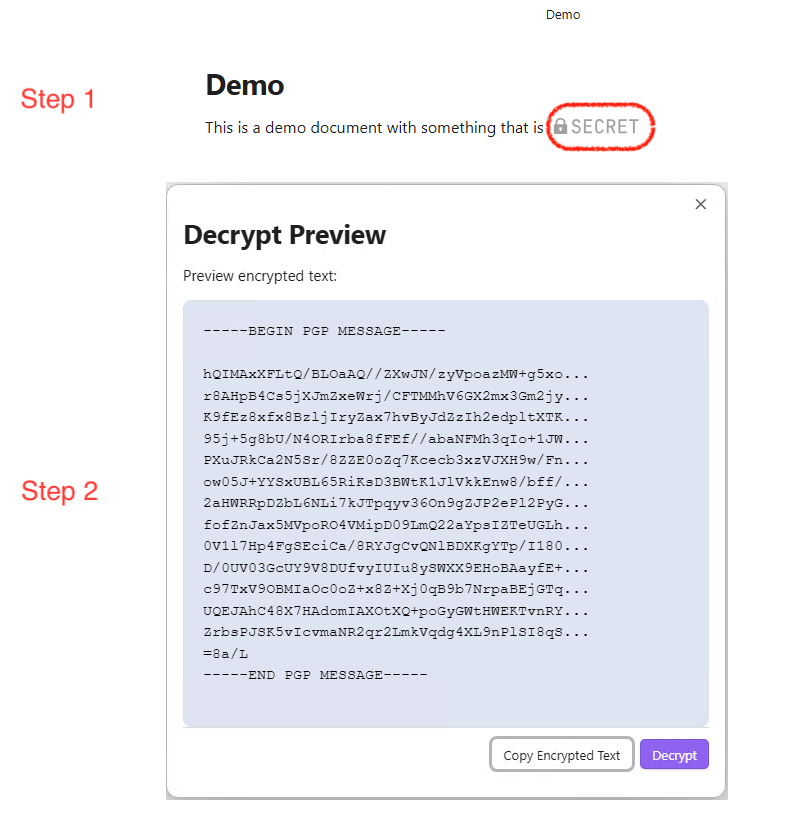
Step 1 - The first step is from a note with an encrypted secret, click (like a button) on the image that says secret Step 2 - This will open a modal with the message encrypted in GPG, if you want to copy the encrypted message, you can do so using the "Copy Encrypted Text" button, you can also decrypt the message with the "Decrypt" button
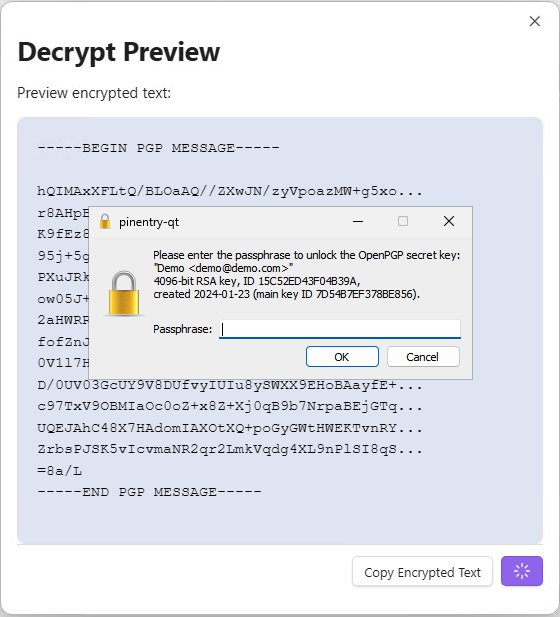
Step 3 - By clicking on the "Decrypt" button, the decryption process will begin, this may prompt you for your phasphrase
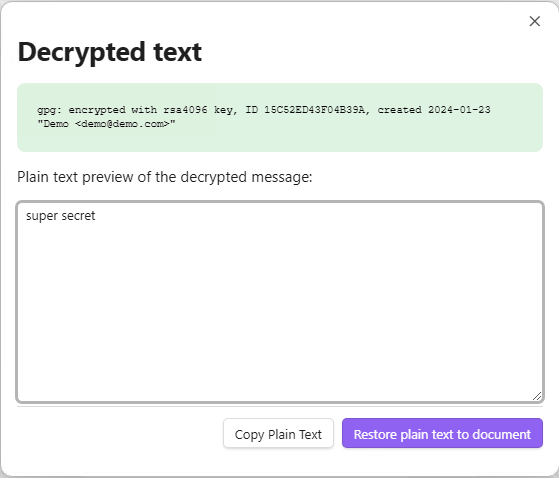
Step 4 - Once the decryption process has finished, you will have a green message with technical information about the process, but you will also have a text area with the decrypted text, here you can copy it using the "Copy Plain Text" button or directly restore the decrypted text to the note using the "Restore plain text to document" button